

Hello Skkawliens! Welcome to the second part of our Star Wars Galaxy’s Edge posts. In our last post, we shared our first impressions and general thoughts from the Galaxy’s Edge theme park. This post will focus our experience building a lightsaber and my very own personal droid. Again, if you’re planning to go and would rather wait to see what the park has in store yourself, you may want to skip this post as we do share a lot of detailed photos and descriptions from these specific park attractions.
**WARNING GALAXY’S EDGE SPOILERS AHEAD**
So following in Anakin Skywalker’s footsteps, let’s start with building a droid! Onward to the Droid Depot!
Building your own Droid at the Droid Depot

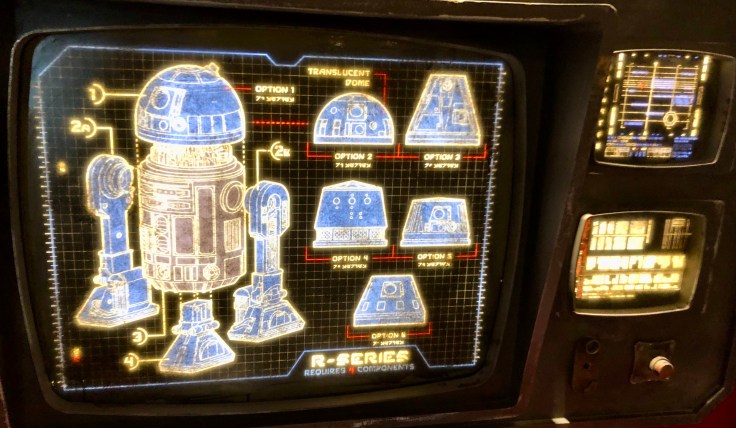
Now, if you’re a diehard Star Wars fan like us though and have a penchant for robotics, visiting the Droid Depot may interest you. What do you do at the Droid Depot you ask? Build your own Star Wars droids of course! Basically, you get to choose between two main types of droids: BB-Series and the R-Series. The BB-Series being the droid class of the newer BB-8 droid you can see in the most recent Star Wars movies (Episodes VII – IX) and the R-Series being the droid class of R2-D2. You can see in the photos below all the different options you can choose from when building your droid:


For my droid, I choose the R-Series class droid configuration. I’m a bit old school and preferred this configuration over the BB-Series. Although, the BB-Series was tempting! Another thing to keep in mind is that the BB-Series droids are prone to their heads coming off. So, with that in mind, I chose the R-Series droid.
After registering at the Droid Depot, I was escorted to a conveyor belt where you essentially choose your preferred droid parts. How do you know what to pick? They provide a guide:

So many options! It took me a moment to select which parts I wanted but I finally decided on a red theme and went with the R2 unit config. See my haul below:

It doesn’t look like much at first but trust me, it comes together pretty quick! After getting my parts I went over to one of the Droid Building Stations and set my parts down. As you can see, from the photo below, they provide a guide for you to work with. There’s also a Cast Member from Disney ready to help you in case you have questions.


They also provide you with an electric screwdriver which comes in handy for the build:

The rest of the steps are pretty straightforward. The experience is similar to a LEGO creation process but with a tiny bit of power tools involved. I think the photos below pretty much speak for themselves:


It was a very enjoyable experience as by the end of it since you chose every piece and basically put it the little guy together yourself, you get a little more sense of connection with your droid. I also especially enjoyed the “activation” portion which added a little flare to the droid creation process. This certainly is in contrast to just buying one off the shelf, which you can do by the way.


As you can see, I very much enjoyed my droid building experience and highly recommend it to you or any of your Star Wars fan friends!
Building your own Lightsaber
After building my own little droid the natural progression seemed to be to build my own lightsaber! I mean what would Anakin do? Similar to the Droid Depot, reservations or coming to the park early is preferred for this experience. Now once you’ve figured out all your reservations and you’ve checked in, the cast members essentially explain the process. You get to pick between four different Lightsaber types. See below for the builds:


Once they gather everyone, you’re guided into a dark room and positioned at a work area for each person.

You’re then presented with the corresponding parts for your lightsaber class.

Also, you get to choose the color of your Kyber crystal. Yes, your lightsaber includes an actual Kyber crystal! For those not deeply in tune with the Star Wars lore, a Kyber crystal is a Force-attuned crystal used by the Jedi and Sith in the creation of their Lightsabers. The Kyber crystal itself goes into the center of the main lightsaber electronic component. And, as an additional bonus, whatever color crystal you choose will change the color of your Lightsaber to that chosen color!


After placing your kyber crystal, you get to choose which parts you want to include in your lightsaber build. I went with the classic look:

And finally, you’re instructed to place your lightsaber hilt into a slot at the side of your work table.

And the lights are slowly dimmed down and your Lightsaber is powered up!


And then you’re instructed to slowly remove your lightsaber and raise it up along with the rest of your group while your cast member speaks a few words of wisdom. I swear I got goosebumps!

Day 2, Final Thoughts
As you can see, we had a blast making our own Droid and Lightsaber! This definitely isn’t for everyone, but for the diehard Star Wars fans like us, it was magical. Disney Parks definitely did a good job on these two park experiences and we highly recommend them to those serious-can-get-enough Star Wars fans out there. And as we said earlier, we couldn’t contain all our adventures in a single post. So if the above isn’t enough check out the rest of our Galaxy’s Edge posts below:
Do you have a Galaxy’s Edge story? If so, feel free to share your experience in the comments below!
And once again, May the Force be with you!
Leave a Reply